12.23.2011
Chic Rule #2
Guys dig girls that understand them but not that act like them... Understand the difference.

12.22.2011
Chic Rule #1
If you invite someone to your house be kind and courteous even if that person is not your favorite. Always say "hi" and spend time with them!
11.29.2011

11.21.2011

11.16.2011
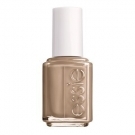
Essie Fall 2011 Collection

Essie colors last longer on my nails than other brands and the color variety is amazing! (so many to pick from) I also love their witty names! This is their fall collection, I personally haven't tried any this season but I am loving the Carry On and the Glamour Purse. Have you tried them? If so which one is your favorite color of this season's collection? Comment or Twit me your answer!
 |
| Glamour Purse |
 |
| Case Study |
 |
| Very Structured |
 |
| Carry On |
 |
| Power Clutch |
 |
| Lady Like |
11.15.2011

11.12.2011
Tutorial Time: How to Make Your Jewelry Sparkle!
Ok, so here is the thing, we all have some kind of ring or necklace or earring that we love. And we also love to wear them all the time! But wearing them all the time makes them dirty because they accumulate dead skin, oils and other gruesome stuff. Here is a tutorial on how to clean your jewelry. I have only tried this on jewelry made of gold and platinium so other than those two I do not know how it will end up. Today I am going to show you how to clean your jewelry using one of my favorite rings. The ring is made of gold and the stone is amethyst.
 Materials needed:
Procedure:
 3. With heat protective gloves take the bowl out of the microwave.
4. Add about 3 caps of ammonia.
 5. Put your piece of jewelry in the mix of water and ammonia and let it soak for 5 minutes
 6. While wearing latex gloves to protect your skin, pick up your jewelry.


WARNING: Be careful with the ammonia because it may burn your skin. Also be careful when taking the bowl out of the microwave because the water will be hot. Also be careful that you don't get sprayed with the mix while brushing the piece of jewelry as this may result in some ammonia falling into your eye and this would be a terrible inconvenience. Also if your precious or semi-precious stone has a crack, it may break when put in really hot water.
 Materials needed:
- old toothbrush
- water
- gloves
- bowl
- ammonia or mr. clean
- jewelry (of course!)

Procedure:
 |
| Before |
 |
| After |
- Pour water into your bowl.
- Heat the bowl with water in the microwave for 1 minute.

4. Add about 3 caps of ammonia.


7. Take the old toothbrush and dip it in the mix and scrub your jewelry thoroughly.

8. Rinse your jewelry with tap water.
9. Dry your ring with a paper towel and admire your new super sparkly piece of jewelry!
 |
| Before |
 |
| After |
Coming soon...
Coming soon... I'll be doing a #hair tutorial. I'll be showing you guys how to give your everyday hair a little "oumph" which you can do in about 5 minutes!
It basically will be what all the bombshell hair that celebrities are wearing have in common, a little oumph. :D
Check this pictures out and see if you can guess what that tutorial will be about. :D


It basically will be what all the bombshell hair that celebrities are wearing have in common, a little oumph. :D
Check this pictures out and see if you can guess what that tutorial will be about. :D


11.10.2011
Bedridden Review :D
Well guys! I just came back from the hospital because I slipped and hit my foot.. got 12 stiches. I'll be reviewing some kind of antiscarring cream, not sure which one yet though, since I need to let the stiches heal before I can put anything on my soon to be coolest scar (jajaja). Anyways, I decided that whuile I am bed ridden, Í'll review the Clean and Clear advantage popped pimple relief gel pen.
This are the recommend directions:
Clean the skin thoroughly before applying this product.
Cover the entire affected area with a thin layer one to three times daily.
Because excessive drying of the skin may occur, start with one application daily, then gradually increase to two or three times daily if needed or as directed by a doctor
If bothersome dryness or peeling occurs, reduce application to once a day or every other day.
Dermatologists do not recommend intentionally popping pimples.
So I tried this product because I read raving review that it helped your pimple in just hours. Before I went to sleep I applied the gel. It took about 10 twist before the gel actually came out of the pen. I dabbed it on my pimple and off to sleep I went. In the morning I woke up to a redder pimple, but I followed instructions and applied the gel again. I applied the gel before going to bed again. The next morning same thing... I must say I was expecting way more. This product did not help at all; it just dried my skin out but the pimple was still there and it still hurt! After 3 days on this product I stopped because my skin was starting to crack which made the pimple harder to hide. I would not recommend this product at all, save yourself the 10 dollars and buy yourself something better.
The best technique that actually cures my ocassinal pimples is to take a towel and dip it warm water and press against the pimple to open the pore. this also helps relief the redness and the pain.
Good luck with your pimples my friends!


This are the recommend directions:
Directions
Dermatologists do not recommend intentionally popping pimples.
So I tried this product because I read raving review that it helped your pimple in just hours. Before I went to sleep I applied the gel. It took about 10 twist before the gel actually came out of the pen. I dabbed it on my pimple and off to sleep I went. In the morning I woke up to a redder pimple, but I followed instructions and applied the gel again. I applied the gel before going to bed again. The next morning same thing... I must say I was expecting way more. This product did not help at all; it just dried my skin out but the pimple was still there and it still hurt! After 3 days on this product I stopped because my skin was starting to crack which made the pimple harder to hide. I would not recommend this product at all, save yourself the 10 dollars and buy yourself something better.
The best technique that actually cures my ocassinal pimples is to take a towel and dip it warm water and press against the pimple to open the pore. this also helps relief the redness and the pain.
Good luck with your pimples my friends!


11.06.2011

11.03.2011
Coming soon...
 |
Proximamente....
Un tutorial cortito sobre un truco que aprendí hace años de un experto en maquillaje para aplicar mascara sin grumos y sin mancharte el párpado! Les va a ENCANTAR!
<3

11.02.2011
Quick Tutorial Wednesday: Side Rope Braid
Here's a quick tutorial on how to do a side rope braid! I love how they look. They give any outfit a bohemian vibe to it. Also if you wake up with a bad hair day this is the best and easiest fix.
Had to change the music so everyone in any country can access it! :D
Had to change the music so everyone in any country can access it! :D
11.01.2011
Coming soon...
Coming soon this week...


This hairstyle will give you a boho/chic look effortlessly.
A short tutorial on how to side-braid your bangs by your's truly!


10.31.2011
Lashes
I believe everyone should learn what mascara to buy and how to apply it. Here is a quick tutorial by Michelle Phan. Hope you guys enjoy!
Pienso que todas las chicas deberian saber que mascara comprar y como aplicarla. Aqui hay un tutorial corto por Michelle Phan. Espero que lo disfruten!
Picture of the day

To all my followers, you should all post this near your computer, so you get disconnnected for a while and enjoy the beauty of your surroundings!


10.27.2011

Favorite Quote #101
"Those who were dancing where thought to be insane by those who could not hear the music"
- Nietzche
- Nietzche
10.25.2011
Shellac Review
Bueno, amig@s, este es mi primer post!


Hace como un mes decidí cambiar de las uñas de resina que llevaba a shellac, ya que el color en las uñas de resina apenas me duraba y se seguían partiendo porque las pedía lo más finita possible. Opte por probar el sistema shellac. De acuerdo al website el esmalte dura 14 dias sin ningun "chip". Este esmalte es un híbrido entre esmalte y gel. Lo cual significa que es tan duro como gel pero con color.
Hoy estoy escribiendo y es el día 19 con mis uñas con shellac. Tengo bastante crecimiento, ya que mis uñas estan creciendo más rapido desde que tomo biotin, sin embargo siguen igual de brillosas y tengo muy pocos "chips". Adicionalmente no se me ha partido ninguna uña y cuando me doy en las uñas sin querer no duele. Yo con mis mano hago mucho trabajo, en especial en los laboratorios en la universidad y sigue bello el esmalte. Estoy fascinada con estos esmaltes shellac. Se los recomiendo a todas. Aqui les dejo unas fotos de mis uñas el primer día y el día 14 y el día 19. Disfruten!
* La compañia que fabrica shellac no me ha pagado para esta evalucación del producto. Yo he pagado por el proceso.
Hi friends! This is my first post!!
About a month ago y decided I did not want to keep maintaing my resin nails. I hated them because they kept breaking and the color always looked dull. I decided to give Shellac a try. The website says the color and shine last for 14 days without chipping. I must say it is day 19 and they still look amazing. I obviously have some growth but they have kept up. They have barely chipped and the color is still shiny! I tend to use my hand a lot in the laboratories in the university yet this hold up better than the resin ever did! I love this shellac system. I leave you here with pictures of my nails, day 1, day 14 and day 19! Enjoy!
* I have not been paid by the shellac company for this review. I paid for the whole process.
^^Day 1 ^^
^^Day 14^^
^^Day 19^^
Querid@s Amig@s!/ Dear Friends
¡Hola Amig@s!
En este blog estaré haciendo unos reviews de productos de belleza con los cual experimentaré en mi misma y la vez dandole un poquito de información sobre la ciencia de tras de estos productos. Adicionalmente estaré tambien añadiendo algunas citas que me parescan bonitas y placenteras y añadiré fotos sobre la moda y cosas que encuentre interesante!
¡Espero que disfruten!
Cariñosamente,
Lola
Dear Friends!
In this blog I will be reviewing beauty products which I will be experimenting with and will add a little bit of information on the science behind this products. I will also be adding quotes and pictures which I find intriguing and gratifying.
I hope you guys enjoy!
with lots of love,
Lola
with lots of love,
Lola
Subscribe to:
Posts (Atom)